Bios does not see the windows 8 installation disk. Why does the BIOS not see the bootable USB flash drive
It happens that the BIOS does not see the bootable flash drive. This can happen on any personal computer with absolutely any operating system, be it Windows XP, "seven" or "eight". What to do if BIOS This is a very popular question among all users. In addition, any owner of a personal computer or laptop has encountered such a problem at least once in their life. Some in a similar situation immediately turn to service centers. And some even go to the store where they bought the flash drive, with indignation and complaints that it does not work.
Of course, it may be that the whole thing is really a faulty device. But sometimes BOIS does not see the flash drive for a number of other reasons. And even if everything was fine before, the problems that have arisen now can be caused by various malfunctions that simply “accumulated” in the system. Or the flash drive may not have enough power of your system unit. Or ... Below are the most popular reasons for which there are troubles with the definition of flash drives and other USB devices, as well as ways to fix these problems.
Why BIOS does not recognize removable media?
When you connect a device via a USB port, it is automatically detected, and Device Manager reports that a new media is connected. In some cases, it also asks you to install drivers or updates. But sometimes the BIOS does not see the bootable flash drive or cannot synchronize its work. What to do in this case? There are several most likely causes and solutions to this trouble.

USB controller: setup
The BIOS is part of the operating system, in which the problems with the flash drive lie in most cases. Where exactly is the problem? The most obvious reason why the BIOS is the USB controller is not working properly or is simply disabled. How to deal with the problem? Turn it on! To do this, in the Award BIOS section, find the Integrated Peripherals subsection, and then go to the second menu item - Advinced (where there will be advanced BIOS settings). Then we find the USB Configuration category, go into it, press Enter and pay attention to the inscription that appears opposite the USB parameters. Disabled (disabled) and Enabled (connected) may light up there. If the controller is in the disabled state, then you need to turn it on using the pointer buttons. Be sure to press F10 to save the changed settings.

If the controller is connected, but the BIOS does not see the flash drive, you can try it on another port of the system unit. Perhaps this one is faulty or incorrectly configured, which is preventing its functioning.
Sometimes none of the ports can identify the flash drive. In this case, the USB controller itself makes sense. Especially often this problem occurs after reinstalling or rolling back the operating system, when some of the necessary data may be lost or the parameters are reset to "default". Therefore, re-downloading all the latest drivers may solve the flash drive issue.
Compatibility Issues
The vast majority of modern peripherals only support USB version 2.0, which, of course, will not be recognized on computers whose interface is set to 1.1. In this case, to solve the problem, you just need to install the supporting software, which, as a rule, always comes with the device - on the same driver disk or separately. Sometimes the necessary applications can be downloaded from the official websites of USB drive manufacturers.

The INFCACHE.1 system file is the root of all evil
If you have tried all the above methods, but the problem has not disappeared, then you can try another, but already a cardinal method. Just delete the INFCACHE.1 system file from your computer. You can find it in the WINDOWS root directory, on the C hard drive, or wherever your operating system is installed. The full path to this file looks like this: WINDOWS:system32DriveStore. You can also find it through a search or with help. If, after deleting this file, the problem disappeared, then all the problems were related to corrupted cache memory. The next time you turn on your computer, the INFCACHE.1 file will repair itself.
And yet it's in the BIOS?
Instructions for setting up this part of the system software will help you deal with problems with a flash drive in some cases. For example, if, as mentioned above, the problem is in a disabled USB controller. Correctly setting up the BIOS is a simple matter, but an important one. Almost any user can cope with this, even with little experience with a personal computer.

So, in order to get into the parameters, you need to press the F2 key (in some cases, DELETE) at the moment when the BIOS system boots. Next, you need to go to the Advanced tab, where you can manage advanced features, select the Integrated Peripherals section and press Enter. After completing these simple manipulations, you can see if the controller is working, as well as other tools that affect the functioning of the ports and automatically detect connected USB devices.
BIOS does not see other devices connected through the port
If the computer fails to identify not only the flash drive, but also other external media and devices connected via USB (for example, a printer, speakers, camera or phone), then this case requires special and radical measures.

Remove the cover (protective side plates) from the computer. As a rule, they are either bolted to the case or fastened to the “latches”, then we connect the USB flash drive or other device directly to the USB port on the motherboard. In most cases, this may be enough for the BIOS to see the device. But if this does not happen, then you can try installing the package of the appropriate drivers for correct operation and elimination of incompatibility problems. If this does not help, there is still a way out!
Other reasons why the BIOS does not see a flash drive and other USB devices
It often happens that a lot of different devices are connected to the computer, requiring a large amount of energy. For example, a scanner or a powerful sound system. And already these two connected devices may be enough to cause a power shortage when even such an economical medium as a flash drive is connected. What can we say about trying to connect a camera to the computer to reset or view photos on the big screen. In this case, the BIOS does not see the flash drive (or other device) due to too low a level of electricity that can be spent on this port. In other words, the device may need more power than the USB connector can provide. As a result, he simply does not have enough power to turn on and operate.
In order to eliminate such a problem, you need to find out the USB controller of your personal computer. You can specify this in the "Device Manager" on the "Properties" tab in the "Power" column. USB 2.0 devices typically need 500mA, while newer 3.0 devices draw as much as 900mA. Based on this, we can assume that sometimes in order to connect a device, you first need to disconnect one or even several previously connected, but currently unused devices. If you are charging your phone or player from a computer, and the flash drive is not detected in parallel with this, then you should try to disconnect the charging cord for a while. In 90% of cases, this will be enough for the BIOS to see the connected device.
Or maybe the flash drive is to blame?
Have you tried everything but nothing helps? Then there is a possibility that the problem is in the device itself. You can read reviews about your flash drive. The BIOS may not be the reason that it is not detected if you come across a device with a factory defect, for example. It is also possible that this model requires some special manipulation or the presence of a USB-HUB for correct operation. There can be many options, so you should explore all existing ways to determine the problem.

Conclusion
If the definition of the problem, due to which the BIOS does not see the flash drive, and its solution was unsuccessful, then, of course, you should contact the service center. But before that, just disable the power management function of the USB controller from the operating system. To do this, go to the "Device Manager", find the "Universal Serial Bus Controllers" tab, select the "USB Root Hub" subsection and double-click on the "Power Management" window, uncheck the corresponding box and click "OK" to save the changes. And repeat this procedure for each USB hub. Perhaps this is what will save you from going to the service center.
Even the most experienced user at some point may encounter an unpleasant moment when an attempt to start the system from a bootable flash drive (for reinstalling Windows, for example) ends in nothing, because the BIOS simply does not see the flash drive. There is a logical explanation for this phenomenon. In this manual you will find a couple of tips that will help solve the problem.
What to do if the BIOS does not see a bootable USB flash drive
First, make sure your USB port is working. Try connecting to a port on the motherboard itself. If you try to solve this problem by overwriting the bootable media, but inserting it into a non-working BIOS port or, in principle, a port, there will be little sense from your efforts, to put it mildly. If the port is working, go to the next solution.
Most often, bootable flash drives are not displayed in the BIOS or Boot Menu due to the fact that the image recorded on it does not support booting in the mode installed on the motherboard (by the user or manufacturer). For example, an image for UEFI is written to the flash drive, and the motherboard is running in Legacy mode, or vice versa. Many motherboards support hybrid mode, which allows you to boot from both UEFI and Legacy drives. You need to go into the BIOS (UEFI) and find the item you need.
For example, on my motherboard from Gigabyte it is called BootmodeSelection and allows you to select two modes at once. It is because of the hybrid mode that when entering the Boot Menu, one drive is displayed twice - one Legacy and one UEFI (if an image is recorded for both systems at once), which allows you to select your preferred boot mode without overwriting the image or changing BIOS settings. On other motherboards, the boot mode selection may be called differently. Eg, Legacy Support or Compatibility Support Mode(it may be signed with the abbreviation CSM). In some cases, it is also called the name of the operating system, like Windows 10 / 8 for UEFI, and for Legacy Windows 7 or Other OS.
If your motherboard only supports one of the boot types, you will either need to switch the BIOS to Legacy / UEFI or reset. An error with the image most often occurs among users who have not figured out how to properly write Windows to a USB flash drive. Many simply copy the contents of the image to a removable drive and then try to boot from it. This method will work on a UEFI system, but will not work on Legacy. And yes, copy content image, not the image itself as a separate file. Copying the image itself will not work even on UEFI. In the case when the BIOS does not see the flash drive, we recommend overwriting the drive, because when trying to install Windows from a Legacy drive to a UEFI system, you may also need to disable Secure Boot.

It is also worth considering that on some motherboards, the USB flash drive must be inserted into the USB port before the computer starts booting. In other words, it will not appear in the boot menu list if you insert the USB flash drive into the port after entering the same Boot Menu. Insert the drive into the port, restart the computer, go to the Boot Menu and boot from the USB flash drive.
If nothing helps at all, try to write Windows to another USB flash drive and boot from it. Alternatively, plug the drive into a USB 2.0 port rather than USB 3.0.
On older BIOSes, USB flash drives are not displayed at all as a separate boot menu item (USB-HDD does not work). In this case, you need to go into the BIOS and find the hard drive priority settings. In the list of connected drives, your flash drive with the recorded system should be displayed. Set it to the first place, save, reboot, and then select boot from HDD from the boot menu. The BIOS will select the flash drive first and start booting from it, which in turn will allow you to install the system.
If all attempts were in vain, you will have to write Windows to another type of media. If the computer you are trying to install Windows on has a DVD drive, try burning the system to a DVD and booting from it. For many, this advice will cause ridicule, but if nothing helps at all (this primarily applies to older computers), booting from a DVD should help solve the situation. You can burn an image to a disc in the same Media Creation Tool, only select a DVD disc, not USB, as the target drive.
Every system administrator should know how to boot computer from usb stick. Most often, this skill is necessary when installing the operating system. After all, the Windows distribution does not have to be located on a CD. And, for example, installing Windows on a netbook in a different way will not even work, because. it usually does not have a floppy drive.
Today I will tell you how to set the boot from a USB flash drive in the BIOS of various manufacturers. Regardless of which version you have, the procedure will be as follows:
1. We insert our bootable USB flash drive into the USB port of the computer. It is advisable to insert it into the port located directly on the motherboard, i.e. from the back of the system unit.
2. Turn on the computer and press the key Delete(or F2) to get into the BIOS. Depending on the manufacturer and BIOS version, other keys (Esc, F1, Tab) can be used, so you need to carefully watch the prompts on the screen.
In Bios, we can navigate through the tabs and rows only using the keyboard.
Next, I will describe this process in detail using the example of different BIOS versions.
Configuring Award Bios to boot from a USB flash drive
Award Bios: First, let's check if the USB controller is enabled. We go to "Integrated Peripherals". We go down with the arrow on the keyboard to the item “USB Controller”. Press the “Enter” key and in the window that appears, select “Enable” (also using “Enter”). Opposite “USB Controller 2.0” should also be “Enable”.
  Exit this tab by pressing Esc.
Then go to "Advanced BIOS Features" - "Hard Disk Boot Priority". Now in my example, the hard drive is in the first place, and the flash drive should be.  We stand on the line with the name of our flash drive (Patriot Memory) and raise it to the very top using the “+” key on the keyboard.
  Exit here by pressing "Esc".
Now on the line “First Boot Device” press “Enter”. We have selected “CD-ROM”, but you need to set “USB-HDD” (if suddenly the boot from the USB flash drive does not work, come back here and try to set “USB-FDD”). Let the second device be “Hard Disk”.  Exit this tab by pressing Esc.
Now exit the BIOS, saving the changes. To do this, click "Save & Exit Setup" - press the key "Y" - "Enter". 
Configuring AMI Bios to boot from a USB flash drive
If, upon entering BIOS, you see such a screen, then you have AMI Bios: First, let's check if the USB controller is enabled. Go to the tab "Advanced" - "USB Configuration".
  Opposite the items “USB Function” and “USB 2.0 Controller” should be “Enabled”.
  If this is not the case, we stand on this line and press the “Enter” key. From the list that appears, select “Enabled” (also using “Enter”).
Then exit this tab by pressing “Esc”.
Go to the tab "Boot" - "Hard Disk Drives".  Now I have a hard drive in the first place, but I need to put a USB flash drive here. We become on the first line, press “Enter” and in the window that appears, select our Patriot Memory flash drive.
  It should be like this:
  We leave from here through "Esc".
Select "Boot Device Priority". Here, the first boot device must be a USB flash drive.  Press Esc.
Then we exit the BIOS, saving all the settings made. To do this, go to "Exit" - "Exit & Save Changes" - "OK". 
Setting up Phoenix-Award Bios to boot from a USB flash drive
If, upon entering BIOS, you see such a screen, then you have Phoenix Award BIOS: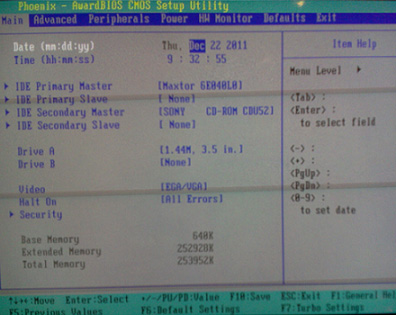 First, let's check if the USB controller is enabled. We go to the “Peripherals” tab - opposite the items “USB Controller” and “USB 2.0 Controller” should be “Enabled”.
  Then we go to the “Advanced” tab and opposite “First Boot Device” we set “USB-HDD”.
  After that, exit the BIOS, saving the changes. To do this, go to "Exit" - "Save & Exit Setup" - press the key "Y" - "Enter"
  That's practically everything you need to know in order to boot from a USB flash drive. In my article, I described the process of setting up the Bios of the most popular versions: Award And AMI. The third example shows Phoenix Award Bios, which is much rarer.
In different versions of the BIOS, the described procedure may be slightly different. But the main thing is that you understand the principle of tuning itself.
By the way, I would also like to add: in order to choose which device to boot your computer from, it is not necessary to change the settings in the BIOS. You can call up a special menu immediately after turning on the computer to select boot devices (this can be done by pressing F8, F10, F11, F12 or Esc). In order not to guess with the keys, we look carefully at the monitor immediately after turning it on. We need to have time to see an inscription like this: “Press Esc to selest boot device”. In my case, it was necessary to press “Esc”.  If on your computer BIOS UEFI, and you need to boot from a USB flash drive - you can familiarize yourself with.
If you need reset forgotten user password using a bootable USB flash drive - how to do it.
Hello dear readers and colleagues on computer topics!
Why can this happen?
Let's take a look at the reasons. Imagine that you decide to install an operating system and find an old flash drive. On the laptop, it was determined, you formatted it and rolled up the system for installation on it. And so you rebooted, and the PC simply did not see the flash. The most common case is that you simply did not transfer BIOS to the boot setting from mobile hard.
It is done like this. To get into these same settings, you need to restart the laptop and when you see this screen -

Then pay attention to which button is written in the line that I underlined. In the figure, I also indicated which keys can also trigger the BIOS (it all depends on the model of the program itself). If you did everything correctly, you will see a screen like this.

Here you need to configure the boot parameters . Go to section First boot device and in this line choose USB-HDD.


Now the computer should see the flash.
The second reason is a problem with the drivers. They either got lost and give out bugs, or were not originally installed. The USB ports are on the motherboard. If they do not work, then the media will not be visible, or it will be determined every other time.
You need to download the software from the manufacturer's website and install it. It is also advisable to scan the laptop for firewood from other devices. It can be done with this software.
Install, scan and reload. In general, such a procedure must be done after each demolition of the operating system and also after its restoration. The program is free, works quickly, completely in Russian.
How to identify the problem?

If you inserted a flash drive, and the computer freezes at the same time, then the problem lies in the media itself. It needs to be formatted at a low level. This is a complete rebuilding of sectors with their cleaning.

Also, system brakes can be caused by a conflict with the hard drive. In this case, you need to check the hard drive itself with a standard program built into the OS. Due to untimely defragmentation of the media, such problems appear.
If you have Windows 7 maximum, then it is quite possible that you have downloaded a self-made assembly. In such cases, only reinstalling the licensed software from the image can help. Of course, there will be no additional chips, but the stability of work in this case is guaranteed. You will have to format the drive, so be prepared to transfer data to an external hard drive or online storage.

If you get an error that says that there is no connection to a portable device, this means that the device itself is failing. Again, it's unlikely you'll be able to save the data, so just format it. Also check the entire computer for viruses, it is quite possible that malicious scripts will block OS operations that are responsible for connecting via usb ports. It is advisable to make this a powerful antivirus with updated databases, and not free counterparts that rarely find anything at all.
One-Stop Solution

If you don’t know what to do and how to fix the problem, then just demolish Windows, format the hard drive and the flash drive itself. It is better to make a major reinstallation of the OS than to do half measures. This was the only thing that helped in my case. In addition, buy a new media, most likely the problem is in it. From the impact, it could be damaged, or the board inside the case shorted.
Conclusion
On this I will end the article. I hope you will not encounter bugs when working on your laptops. Share the article on social networks and subscribe to the blog to be aware of new materials! All the best to you and see you, my dear readers!
How is it happening? It's very simple friends! On latest Samsung laptops, there are several new options in BIOS ("Fast BIOS Mode" and "Secure Boot"), which are directly related to the ability to boot a laptop from a USB flash drive or disk. Samsung Corporation suddenly decided to protect the download of the new Windows 8 operating system from some kind of virus or from the laptop owners themselves, as you like. Naturally, many users immediately had questions.
A friend of mine wanted to boot a Samsung laptop from a bootable flash drive containing the Acronis backup program in order to backup Windows 8, but nothing came of it. The other one decided and also got stuck at the very beginning, he just couldn’t find his flash drive anywhere, neither in the BIOS, nor in the laptop’s boot menu. After he tried five flash drives, he flew to me with bulging eyes and said that his new laptop could not be loaded either from a disk or from a flash drive. In short, I had to figure it all out, and if you also find yourself in the same situation, read our article.
Booting a Samsung laptop from a flash drive
If you suddenly want boot samsung laptop from flash drive, then you will try to enter the laptop boot menu using the F10 key at boot and select your connected USB flash drive there, but nothing will work for you, because first of all, you need to make small changes in the laptop BIOS parameters.We turn on the laptop and immediately press F2 at boot, enter the BIOS, go to the Advanced section and set the Fast BIOS Mode parameter to Disabled.

Then we go to the section Boot, we are interested in the option " Secure Boot",

put it also in the position " Disabled"And press" Enter "

There is a warning about the possibility of loading a laptop with an error.

We agree, press " Enter". An additional parameter appears below "OS Mode Selection",

We put it in the position " CMS OS" Or " UEFI and Legacy OS"
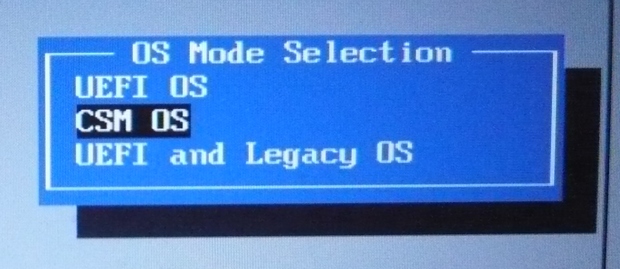
And press "Enter". Again, a warning appears about the possibility of loading a laptop with an error, "Enter".
We save the changes we made in the BIOS, press "F10" on the keyboard. To the question "Save the changes and reboot?" press "Enter". Yes.


The laptop reboots, press F10 and get into the boot menu, select the USB flash drive, the Samsung laptop is loaded from the USB flash drive.
If you cannot get into the boot menu of the laptop, then you need to change the priority of the boot device directly in the BIOS. We enter the BIOS, go to the Boot section, then the Boot device Priority option,

our flash drive should be here, set it as the first boot device, then press F10 (save the changed settings) and reboot. After rebooting, your laptop will boot from the flash drive.