Installing widgets on the desktop in Windows OS. Widgets in WordPress Saving widgets when changing template
Most users are already accustomed to the Yandex main page, but it can be easily changed. For example, make the main page like this:
The settings are valid only for the browser from which you configure!
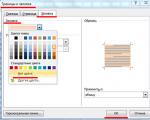
Let's start with the design. To select a theme for the main page, you need to click the icon in the upper right corner and, in the menu that appears, select the line “set a theme”.

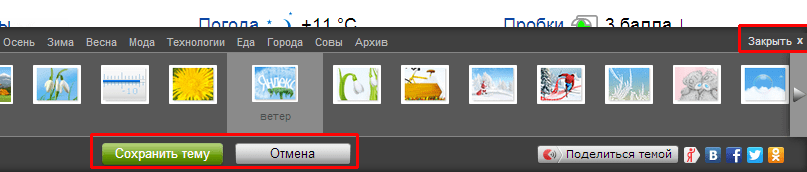
Animated themes appear at the bottom of the page; click on them to see what the page will look like.

For the convenience of selecting the required topic, you can choose from the proposed sections, for example, “summer”, “spring”, “fashion”, etc. Sections are indicated at the top of the topic menu that appears. Topics are also divided into “all” and “new”.

If you are not satisfied with the topics, you can scroll through the topics using the arrows left and right.

After selecting a theme, you need to click the “save theme” button, which is located below. If you change your mind about installing the theme, you can close the window or click the “cancel” button.
The second item in the Yandex appearance settings menu is “configure Yandex”. Here you set the widgets that you will see on the main page of Yandex search.

When you click “configure Yandex”, we go into the mode of replacing and deleting unnecessary widgets. Widgets can simply be dragged with the mouse into place of another widget (point at the widget, hold down the left mouse button and drag), or they can be deleted by clicking the cross in the upper right corner. Some widgets have their own settings, depending on the information shown. For example, the “Yandex traffic jams” widget can be configured for any city, and you can also set a “work-home” route.

In addition to the widgets shown, you can select others. To do this, click the “add new widget” link in the upper left corner.
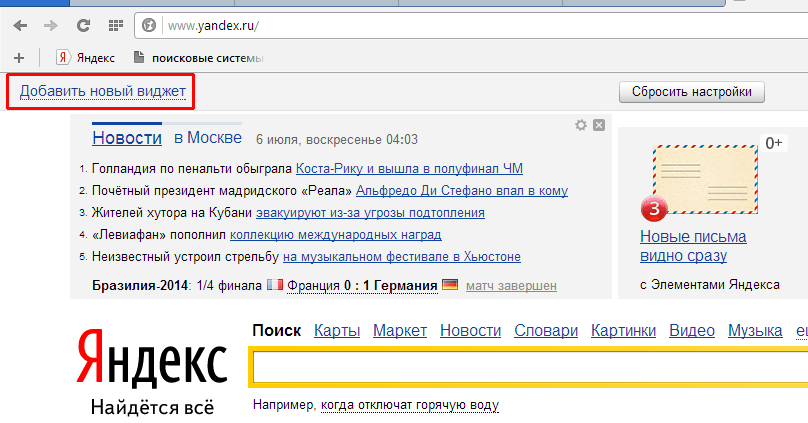
On the left you can select the theme of the widget you are interested in, and on the right are the widgets themselves with a short description. At the bottom of the page there is a numbering for moving to the next or previous pages.

To select a widget, hover the mouse cursor over it, the add button appears, and click with the left mouse button (you don’t have to click on the button, just click on the gadget or name).

After this, the widget appears on the main page and you can drag it in place of other widgets. You must select an action - “keep” or “delete”.

There are buttons in the top menu - “return” to return deleted widgets (if you haven’t deleted them, then there will be no such button), “reset settings” - returns everything as it was originally, the entire page design is also reset, “cancel” to return the same appearance , which was before the changes and “save” - to save the changes.
In the field for entering the name of the city, we begin to enter the initial letters of the city and then select it from the drop-down list. You cannot enter the city yourself, you can only select from the list. Here you can set the default city, that is, the city will be determined automatically. By checking the “do not specify my location” checkbox, you will not be shown pop-up windows with a question, for example, “are you in Moscow?” and two answer options - “yes” and “no”. After selecting the city, click the “return” button.

Widgets are one of the many amazing features of WordPress. If in order to edit the content of the site, we use the editor and , then to change the content of the sidebar or footer, widgets are exactly what we need.
Essentially, widgets can be added anywhere on site pages, but this depends on the WordPress theme you are using, or more precisely on the number of people registered in it. There are themes that don't support widgets at all.
How to Add or Remove Widgets (For Beginners)
To create a widget in WordPress, first you must have at least one sidebar connected, if you have difficulty with this, then you should read the detailed one (it also describes how to add widget support in a WordPress theme). Widgets can also be displayed on the site directly through PHP code using the function.
If you have figured this out, go to the page in the admin panel Appearance > Widgets. See the list of available widgets? In order to add a widget to the site, you need to drag it to one of the areas on the right (sidebars).

In later versions of WordPress, there is another way to add a widget - you just need to click on its title and select the sidebar you want to add it to from the drop-down list:

Once the widget is added, we will see its settings. In the Calendar widget this is the title:

This way we can add an unlimited number of widgets to any area of the site, customize, edit them, and change the order by dragging and dropping.
In order to delete the widget, click the “Delete” link (you can see it in the previous screenshot). If you only want to temporarily disable a widget while saving its settings, drag it to the “Inactive Widgets” block, which is located under the “Available Widgets” block.
Disabling default WordPress widgets
If you do not use and do not plan to use any of the standard WordPress widgets, you can completely disable it using the function, after which the widget will no longer be displayed in the admin panel on the page Appearance > Widgets, it will also disappear from the site pages.
To disable widgets, you can use the ready-made code below:
- Paste the code into the functions.php file of the current theme.
- Delete or comment out lines with those widgets that do not need to be deleted.
- And only then can you save the file.
| function true_remove_default_widget() ( unregister_widget("WP_Widget_Archives" ) ; // Archives unregister_widget("WP_Widget_Calendar" ) ; // Calendar unregister_widget("WP_Widget_Categories" ) ; // Categories unregister_widget("WP_Widget_Meta" ) ; // Meta unregister_wi dget("WP_Widget_Pages" ) ; // Pages unregister_widget("WP_Widget_Recent_Comments" ) ; // Latest comments unregister_widget("WP_Widget_Recent_Posts" ) ; // Recent posts unregister_widget("WP_Widget_RSS" ) ; // RSS unregister_widget("WP_Widget_Search" ) ; // Search unregister_widget("WP_Widget_Tag_Cloud" ) ; // Label cloud unregister_widget("WP_Widget_Text" ) ; // Text unregister_widget("WP_Nav_Menu_Widget" ) ; // Custom menu) add_action ( "widgets_init" , "true_remove_default_widget" , 20 ) ; |
This feature allows you to delete not only standard widgets. As a function parameter, you can specify the name of the class of any widget (for example, which was registered in a plugin).
If you have any customized widgets on your site, keep in mind that when you delete a widget, all its settings will also be deleted, so if you suddenly later decide that you need the widget that you disabled, you will have to configure it again.
Creating your own widget
Adding your own widget with settings to WordPress is not at all difficult, but of course it wouldn’t hurt to have at least a little understanding of PHP. I will not describe how PHP code works in this post, just ask your question in the comments if you have any difficulties with the code.
Now we will create a widget of popular posts - we will display posts sorted by the number of comments via .
In its structure, our widget will be similar to the standard WordPress widget “”, that is, it will have similar parameters (title and number of displayed posts) and a similar HTML template for displaying posts (post titles with links in the form
- -list).
- ">
- Beautiful Yahoo Weather— a weather forecast widget, quite good and beautiful compared to analogues. But for these purposes it is probably better to use WordPress in conjunction with informers from Gismeteo, Yandex, etc.
- NextGEN Gallery is a plugin for creating and managing image galleries in WordPress, one of the functions of which is a gallery widget.
- Search by Google— a site search form from Google (Google Custom Search).
- Slick Contact Forms— feedback form widget.
- Tabbed Login Widget- authorization widget, made in the form of three tabs - “Login”, “Registration”, “Forgot password”, very convenient.
- WP Currency Converter- Currency Converter.
- WP Editor Widget- use the WordPress editor to populate this widget.
- WP-Cumulus— adds a flash cloud of tags and/or categories.
- WP-Polls— a convenient plugin for creating surveys on the site.
- Yet Another Related Posts Plugin (YARPP)— a powerful plugin for displaying similar posts.
- YouTube Channel Gallery— a widget with the latest videos from the YouTube channel. The widget looks very nice, good and easy to customize.
- quickly search for information on the Internet and directly in the device itself;
- reduces the time required to complete various operations;
- Instant user access to controls and settings, as well as installed applications.
Paste this code into functions.php:
/* * creating a widget */ function __construct() ( parent::__construct( "true_top_widget" , "Popular Posts", // widget title array("description" => "Allows you to display posts sorted by the number of comments in them.") // description ) ; ) /* * widget frontend */ public function widget( $args, $instance) ( $title = apply_filters( "widget_title" , $instance [ "title" ] ) ; // apply a filter to the title (optional)$posts_per_page = $instance [ "posts_per_page" ] ; echo $args [ "before_widget" ] ; if ( ! empty ( $title ) ) echo $args [ "before_title" ] . $title . $args [ "after_title" ] ;
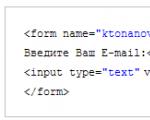
get_field_name("title"); ?> " type="text" value=" get_field_id("posts_per_page"); ?> ">Number of posts: get_field_id("posts_per_page"); ?> " name=" get_field_name("posts_per_page"); ?> " type="text" value=" " size="3" />/* * saving widget settings */ |
public function update( $new_instance , $old_instance ) ( $instance = array () ; $instance [ "title" ] = ( ! empty ( $new_instance [ "title" ] ) ) ? strip_tags ( $new_instance [ "title" ] ) : "" ; $instance [ "posts_per_page" ] = ( is_numeric ( $new_instance [ "posts_per_page" ] ) ) $new_instance [ "posts_per_page" ] : "5" ;// by default 5 posts are displayed return $instance ;

Let's drag it to some sidebar on the right:

That's all, we indicate the title of the widget (if necessary), the number of posts that we want to display and click “Save” - after that the widget will appear on the site.
List of plugins with useful widgets
Of course, you don’t have to create each widget yourself; you can use ready-made solutions for specific tasks.
In order to add any of these plugins to your site, copy its name, go to the admin panel Plugins > Add New and paste the copied name into the search form.
I won’t describe each plugin in detail - the description of almost each of them would be worth a new post. Install, watch, test (at the time of publication of this post, each of the plugins was tested by me personally and everything worked perfectly).
Over time, the list will be expanded.
I will not consider all the other social network widgets (Facebook, VKontakte, Twitter, etc.) - in principle, the official widgets are quite convenient - we just copy the code that they give us and paste it into the WordPress widget "".
If you need help with your website or maybe even development from scratch - .
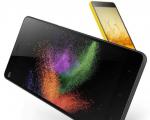
Experienced owners of mobile Internet devices based on the Android platform are probably familiar with what a widget is. Today’s article will be interesting and useful to those who are just starting to get acquainted with this concept. This is an important component of Android devices, allowing you to quickly obtain information of interest, access applications, and also customize your mobile device to your own needs. Let's talk about this in more detail, and also find out how to install a widget on Android and how to remove it if necessary.
Today, it is impossible to imagine a tablet or smartphone without such an important and useful “thing”. With it, you can find out about the weather outside the window, about traffic jams on the road in your city, turn on/off a flashlight or Wi-Fi (read about that here), get information about the battery status or unread letters.
A widget is an element of the Android desktop, designed to solve certain problems and obtain useful information from the Internet. Most basic mobile devices are already equipped with some widgets, which are also often included in various popular applications. They can come in different shapes and designs, ranging in size from a small label to a full-screen image.
Their use will bring a number of advantages to the user of a tablet or smartphone:
I propose to consider in more detail the process of installing and removing them from a digital device. It should be said that if during installation you receive an error message: “There is not enough memory in the device,” then its solution is described.
How to install a widget on Android.
If you are not satisfied with the standard set of applications installed by developers on your tablet (smartphone) by default, then you can easily install new ones on it. A wide variety of widgets can be found in the Google Play app. Just choose the one you like, download and click the “Install” button.
After it is installed on your tablet/smartphone, you should place it on the desktop of your device. Depending on the Android OS version, the installation process differs slightly. Let's consider installing a widget on the desktop in Android 4.x.
Go to the “Menu” and go to the tab of the same name and select the desired widget to install.

Let's say we want to add a “Clean Master” memory indicator to the desktop area. Hold down on it and drag it with your finger to a free area of the desktop. Move your finger away from the touchpad and the widget will be placed in the specified location.

If you need to change its location, it is very easy to do. Make a long touch on the widget and, without releasing your finger, drag it to a new location.
Now let's look at how to install the widget on a device with an earlier version of Android. To place this information block on the desktop in Android 2.x, you need to click on the touchpad at its location. After this, the “Select Widget” window will open, where you need to select the block of interest.

So, friends. Once upon a time, I promised to write to you on how to add new widget zones to your WordPress template or edit old ones. But unfortunately, I forgot about it.
I apologize for this. Thank you very much Marina for reminding me of this. I really love receiving feedback from visitors to my site. And I'm always happy to help.
Let's get started.
First of all, I would like to talk about what a widget is in WordPress. Many people probably don't know.
Widgets are functional blocks that are used to layout your template. WordPress comes with over a dozen widgets by default. For example: categories, archives, text field, calendar, etc. They are located in the WordPress admin panel in the tabs "Appearance" ->"Widgets" .
In addition, many plugins can add their own widgets, which, after installing the plugin, we can also place on the site. But we cannot place them everywhere. But only in those places that were originally designated for widgets.
This is what we will talk about now.
1. Initializing widget zones in the functions.php file
Yes Yes. It is in this file that the widget zones are registered. This file is located in the folder with your theme. More specifically here:
/wp-content/themes/theme_name/functions.php
Open it with any text editor. It is most convenient to use Notepad++ (for more advanced users - Adobe Dreamweaver). And scroll it almost all the way down. Before function:
There may be several similar ones. As a matter of fact, the number of widget zones that will be in your template depends on how many of them are written.
Let's look at the syntax.
This line indicates that we will now describe widget zones, and not something else.
This line specifies the name for the widget zone, which will be displayed in the admin panel on the “Widgets” tab. “twentyten” is the name of the topic (yours may differ).

This is the description that will be displayed when you open the widget area in the "Widgets" tab.

Let's continue looking at the code:
This code will be added before the title, which we will enter into the text field when creating the widget itself.
| "after_title" => "" , |
Accordingly, this code will be added after the header. We close the tags in it that we opened before the title.
That's all! The widget zone initialization is complete. Go ahead.
2. Placing the widget zone in the template.
It all depends on where you want to place the widget area. If you want to place it in the header, then add the code to the header.php file.
If in the sidebar, then to the sidebar.php file
If in the basement - then in footer.php
Now let's look at the code that needs to be added:
This code checks if any widgets have been added to a specific zone. After all, you must agree - there is no point in displaying a zone if there is not a single widget in it.
“primary-widget-area” is exactly the same identifier that I talked about in the previous chapter. It points to a specific area.
So, the condition was checked. If the widget is not added to the zone, the zone is not displayed, but if it is added, then the following construct is inserted into the page code:
Inserts a specific widget zone at this location. Again, identified by “primary-widget-area” - the same identifier.
OK it's all over Now! Now you know how to add a widget area to your WordPress template.
I wish you to understand this topic and create templates that are needed specifically by you, and not by the person who created the template.
And don't forget to subscribe for updates. There are still a lot of interesting things waiting for you.