Install all drivers on windows 7
A computer is a machine that raises many questions for new users. Therefore, today we’ll talk about how to install drivers on Windows 7. Every user should be aware of this procedure. Otherwise, he will have certain problems connecting various equipment to the computer. What should you pay attention to? How to reinstall or initially install drivers in the operating system? All this will be discussed further below.
Driver is...
First, you need to understand what kind of software we are talking about. After all, it is possible that the user will not need the software being studied.
In fact, drivers are extremely important components. This is a kind of software package that helps determine this or that connected equipment in the operating system. Without a driver, not a single component of the PC will work properly. Or it simply is not recognized. Therefore, it is important to know how to install drivers on your computer on Windows 7.
What is there on
Some people are interested in what equipment they will encounter when connecting to the software they are studying. This is normal. After all, as a rule, some computer components work without a driver initially. Although not entirely correct.
In general, if a user is thinking about how to install a Windows 7 device driver, it is necessary to realize that this procedure is important for any equipment. Without the appropriate software package, the component is not recognized by the operating system.

Most often you have to work with drivers:
- sound card;
- video cards;
- random access memory;
- removable media (like flash cards);
- mice;
- keyboards;
- joysticks;
- web cameras;
- microphones;
- headsets;
- printers and scanners.
In general, if you plan to connect any equipment, it will require the software you are studying. How to install drivers on Windows 7? What does that require? What difficulties can you encounter during the procedure?
Automatic detection
In Windows 7, users received a unique ability to automatically search for drivers on their computer. This means that a piece of equipment will not require additional manipulations to determine the connected component.
How to act in such a case? How to install drivers automatically on Windows 7? You can consider the situation using the example of memory cards or removable media. It is this equipment that usually does not require additional actions.

In order for the required software to be automatically searched and installed, the following is required:
- Turn on the computer. You must wait until the operating system loads.
- Insert the equipment into the appropriate slot. For example, a flash card into a USB connector.
- Wait a while. In the operating system, when connecting the equipment for the first time, a message will appear about automatically searching for a driver and initializing it. If the software is installed, the OS will notify the user that the connected component is ready for operation.
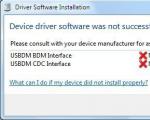
Now it’s clear how to install the driver automatically. Code 28 for Windows 7 is the installation error number of the corresponding software for the connected equipment. It appears when it was not possible to find a driver for a particular component on the computer. How to deal with such a problem?
Manual driver installation
Most often, this is exactly the scenario that takes place. How to install drivers on Windows 7? Often you have to carry out the entire process yourself. Removable media does not require additional manipulations, but other equipment does.
Accordingly, the user must manually install the software package to debug and recognize the device. The procedure is performed for each connected equipment.
The process boils down to the following scheme:
- The computer turns on. As in the previous case, you need to wait for the OS to load.
- Connect the device to the appropriate connectors. If necessary, connect the equipment to the network.
- Run a special driver installer program. It is usually included with the equipment.
- Following the instructions of the initializer, complete the installation process.
- To restart a computer. An optional, although desirable, procedure.
After the driver installation is completed, a corresponding message will appear on the computer indicating that the operating system has recognized the new device. This means that from now on it will work properly.

What is needed for manual installation
However, not everything is as simple as it seems. The fact is that the process of manual installation of the software being studied sometimes requires some preparation. What needs to be done to be fully prepared for the procedure?
Today, if a user is wondering how to install drivers on Windows 7, he should prepare:
- a working PC to which the component is planned to be connected;
- connected equipment;
- wires for connecting the device, usually included with the component;
- installation disk with drivers (also included).
Without all this, it will not be possible to bring the idea to life. Sometimes it happens that the disc is either not included or is missing altogether. What to do in this case?
If there is no disk
How to install a printer driver on Windows 7 or any other equipment without an installation disk? It's not that hard to do! The main thing is to follow the small instructions.

It looks like this:
- Turn on the computer and wait for it to boot.
- Connect to the Internet.
- Look at the model of the connected equipment. It will be written either on the device or on the box with it.
- Go to the official website of the equipment creator.
- Search for a driver for the corresponding device. There are special lines for this on the creators’ website.
- Download driver. It will download as an executable file.
- Connect new equipment to your computer.
- Launch the downloaded driver and, following the steps prescribed in the installer, install the software.
There is nothing difficult in the process. The only thing we recommend you pay attention to is the version of the driver you are downloading. It is advisable to download the latest software build. Otherwise, the device may not work correctly.
Printer
How to install a printer driver on Windows 7? To bring your idea to life, you need to use one of the previously given instructions. If we look at the process in more detail, we will have to slightly change the proposed steps.

Installing the printer driver, as well as connecting the corresponding equipment, is as follows:
- Install the printer in a location convenient for the user.
- Connect all available wires to the switched off device. One of them is connected to the network, the other is connected to the computer.
- Turn on the PC and printer.
- Insert the driver disc into the computer. Or run the appropriate installation file.
- Install the driver following the instructions in the Software Installation Wizard.
A little wait - and the process is completed in Windows 7. “The printer driver was installed successfully” - this is exactly the message the user will see. If something goes wrong, the equipment simply will not work.
Hello, friends! If you need to know, how to install drivers to your computer, then you have come to the right place. Over the three years of the site’s existence, we have written twenty articles for you, from which you can learn how to accurately identify an unknown device installed in a system unit or laptop using the ID equipment code and install drivers on it from the manufacturer's website, for example, to: , video card and , , , and so on. In this same article, we want to show you how to install drivers automatically using the Windows 7, 8 operating system itself and using special services: DriverPack Solution and ma-config.com. You'll also learn how to install or update drivers if you don't have internet, but to do this you'll have to take a few preliminary steps.
To make it more interesting, we will install drivers on a laptop and two system units that my colleagues brought to me. After installing the operating system, some drivers were not installed on them and you and I will need to install them. For example, the driver for some “Main system device” did not install on the laptop; they could not find the driver even on the Internet using the ID equipment code. So, let's go! At the beginning of the article we always publish several of your letters.
How to install drivers
Got the question! There are situations when finding drivers for a specific device is quite difficult. For example, take the case of our reader. Usually, drivers for all laptop devices are available on the website of that same laptop, but if the drivers are not there, what should you do? This happens, of course, quite rarely, but it does happen.As you understand, all components for a laptop are supplied by certain manufacturers, and each such manufacturer has an official website, on which drivers for Windows XP, Windows 7 or Windows 8 are probably posted. Another question is that searching for all these sites for an ordinary user is a long and tedious task, yes and not all of them are in Russian. A good thing, for such a case, is to launch a special program and it will find all the drivers not installed in Windows.
There are not so many good and free programs that can detect the missing drivers in the operating system, and even install them. In my articles I often mention the DriverPack Solution program. The ma-config.com automatic driver installation service is also good and we’ll talk about it today too. But first of all, to install the missing driver, you need to use the capabilities of the Windows 7, Windows 8 operating system itself. How? Now you'll find out! Let's look at some good ways to install drivers automatically.
How to install drivers automatically using Windows itself
One friend brought me a laptop that had one device without a driver; together with his friends, he searched the entire Internet and could not find this ill-fated driver. Finally, everyone decided that the device was faulty, so the driver could not be installed on it, so the laptop came to me.
Modern operating systems from Microsoft Windows 7, 8 contain a huge database of drivers for a huge number of different devices. Let's use this database to help us. Before starting work, I recommend creating a system restore point.
Let's use the "Device Installation Options" tool, with its help you can install the missing driver into the operating system. Some experienced users do not use it, believing that the drivers “from Microsoft” are stripped down, this may be true, but it is better than nothing and the device will work with them, and not be an eyesore with a yellow circle in the Device Manager.
Usually, the “Device Installation Options” tool is disabled for users, let’s enable it and see how it works. To do this, you just need to switch the “Device Installation Options” tool to “Automatic mode” in the “Control Panel”.
In Windows 7 Start->Devices and Printers.

In Windows 8, right-click in the left corner and also select “Control Panel”


Right-click on the name of your computer and select "Device Installation Options"

Check the box “Yes, do this automatically (recommended)” and Save.

If the operating system contains a device without drivers, then almost immediately an automatic search and installation of drivers for these devices will occur.

But sometimes the system will not be able to do this and you will see the following warning: “The driver could not be found”

Or you can simply go to Device Manager, right-click on the device without drivers and select “Update Drivers” and it will search for drivers for the device.


How to install drivers automatically using a disk or DriverPack Solution program The official website for automatic driver search DriverPack Solution is located at http://drp.su/ru/download.htm
On this site you can download four tools for searching for drivers: Lite, DVD, Full, Configurator. Let's take a brief look at all of them, then choose what you need. The Lite version will be installed on your computer. The DVD version will be downloaded to you as an ISO image, which you will need to burn onto a DVD disc. Version Full can find almost all the drivers you need, works without installation and you can carry it on a flash drive.
The first thing that is offered is the Lite program. Let's use it to find a driver for our "Main system device"


It is written in great detail how to work with the Lite version in our article “How to install a driver for a webcam.” But here I will say a little shorter. Download it

Then install

run, the program scans your operating system for all installed and uninstalled drivers. Immediately check the boxes for “Settings” and “Expert Mode” (it’s more convenient to work), then go to the Online tab. As we can see, our problem is solved, the program was able to select a driver for our unknown “Main system device”, to download and install our driver, click on the button with the hardware ID code of our device: PCI\VEN_1180&DEV_0592&

The file is downloaded, this is the installer of our driver, as it turns out, for a Ricoh card reader. Let's launch it.


Ready.

Our unknown device Ricoh Memory Stick Host Controller

In exactly the same way, you can install the driver on any other device!
How to install drivers using DriverPack Solution DVD
Select the DVD version and Download.

To download we need a free utorrent program, if you don’t have it, download it from the link
http://www.utorrent.com/intl/ru/

Let's install the DVD driver for the webcam using DriverPack Solution.
This version of the program is a disk image that can be burned onto a DVD disc and carried with you everywhere. Or you can open the image in DAEMON Tools Lite and work with the image that way. Open the image and run the DriverPack Solution.exe file.


A window that is already familiar to us opens. Go to the Drivers tab. We also check the boxes “Settings” and “Expert Mode”. As you can see, complete information has been provided on the situation with drivers in our operating system. One driver for our webcam is missing. Check the webcam box and select Smart installation (recommended). That's it, the driver for our webcam is installed. Please note that 22 drivers can be updated to the latest versions, but if your computer is stable, this is not necessary.


How to install drivers using DriverPack Solution Full
Using this package, we will install an unstable driver for the Intel Management Engine Interface, which is built into the motherboard chipset and performs important monitoring processes. In Device Manager, you will notice that opposite it there is a yellow triangle with an exclamation mark, signaling that our device is not working correctly.

Of course, this driver can be downloaded from the official Intel website, which is what we did in the article “How to install drivers on the motherboard” (link to the article above). In the same article we will install this driver using the DriverPack Solution Full program
DriverPack Solution Full Contains a huge driver package, I carry it on a flash drive just in case. For example, friends will ask you to reinstall the operating system and after reinstallation it turns out that the driver was not installed on the network card, so you won’t be able to access the Internet and you won’t be able to download the driver, so you can successfully install the driver on your network card using the DriverPack Solution Full build. which is on your flash drive.
How to work with this version is described in great detail in the article “How to download and install drivers on the motherboard.” Here I will say the main thing.
Click Download

To download, you will again need a torrent program.

The program is downloaded in a .rar archive. Unzip the program into a folder. If you don't have an archiver, you can download free 7-Zip from
http://www.7-zip.org/
As soon as we unzipped the archive with the program into a folder, go to this folder and run the file in DriverPackSolution.exe.

In the program window that opens, we see that not all drivers are installed,

We tick our Intel Management Engine Interface and click “Intelligent installation (recommended). Our driver is installed.

There are 7 outdated drivers that can be updated. Check the driver data and click Install.
You can install and update drivers selectively, check the box next to the desired device and click Smart installation (recommended). Or you can check the boxes for the required drivers and click Install.

Go to the website www.ma-config.com/ru/. Click on the “Start analysis” button

"Automatic installation"

The plugin is downloaded to our computer, you can click “Launch”.

Installing the plugin.

"Fine"

"Refresh the page"


Complete information about our computer is displayed.

Now you need to click “My drivers.

If you want to download or update any driver, click Download.

Download.


Article on this topic:
Drivers are a necessary part of the software for a fully functioning computer. If you have difficulty finding and installing them, use our step-by-step instructions below.
How to install drivers for Windows 7 on a laptop
If you know the model of your portable device (if you don’t know, look on the case, under the battery pack, or with the wmic csproduct get name command), you should immediately go to the official website of the manufacturer of our PC. The same fact applies to branded system units produced by Dell, Asus, and other famous companies. All that will remain on the site is:
- enter the model name into the search bar;
- go to the page with a list of programs;
- open the list of available software;
- select the type of operating system – Windows 7 or another;
- download the latest versions of the required files.
Installing drivers from official websites is always free and will reliably protect you from the tricks of attackers.
How to install drivers on Windows 7 – Driver Pack Solution program
If you are in no hurry and are willing to spend some time manually installing drivers, the first method is, of course, preferable. Otherwise, you can use the Driver Pack Solution program from the site https://drp.su/ru/, which automatically finds and installs the necessary software in a few clicks. This is a fairly reliable and fast utility that you can trust (unlike some similar programs). However, in rare cases, automatically installed drivers may not work correctly and require additional intervention. This will happen when the device is unknown to the program, which is why it will install not the best official driver, but a compatible one.


How to find out which drivers are needed to install on Windows 7
When installing Windows 7, a basic set of drivers is already present in the system itself and is automatically applied to existing hardware. For example, the OS will “see” the NVidia video card, but not the specific NVIDIA GTX780 model. Therefore, in order to take advantage of all the benefits of connected hardware, you will have to search on official sites. To find out which devices require drivers:
- press Win+R and write the command devmgmt.msc;
- Device Manager will open;
- go to sections by clicking on the arrow icon;
- look at which devices are marked with a yellow question mark;
- right-click on this item and select “Properties”;
- go to the “Details” tab, in the “Properties” field select “Equipment ID”;
- copy the ID and go to devid.info to determine the hardware;
- We do not insert absolutely the entire value into the search line, but only numbers associated with the VEN and DEV indicators (for example, HDAUDIO\FUNC_01&VEN_10EC&DEV_0280&SUB);
- Then, from the search, you can download the required driver, or go to the official website with the required model number already recorded.


To avoid confusion in the installation sequence, install the drivers associated with the motherboard first, and then all the others. Previously, it is better not to use such popular collections of drivers from disk - this is an easy way to introduce unwanted and malicious programs onto your PC.
The installation file is usually called setup or install and has a *exe or *msi extension. Drivers from the Internet are usually downloaded as an archive with a *rar or *zip extension.
The driver archive often contains a folder with one *exe file. In fact, this is a self-extracting archive, launching which will open the extraction settings window, and then the driver installation file itself.

Often, after extraction, the installation file does not run. In this case, you need to find the directory created during unpacking and run the installation file manually. Therefore, it is better to immediately extract the archive to a subdirectory of the current folder, then perform the installation yourself.
The folder may not contain the installation file. There are two installation options depending on whether you need to install a new device driver or update an existing one. In the first case to run Installation Wizards drivers run the command Adding a device V Control panels and follow the instructions in the windows that appear.
How to install drivers on Windows through Device Manager
To install the driver on Windows for already connected equipment, run device Manager. This can be done in several ways: press the Win+R key combination and enter devmgmt.msc in the window that opens, or press Win+Q, enter Device Manager in the search field and press Enter. From the list in the window device Manager select the desired hardware (it may be an unidentified device), right-click and in the context menu that opens, execute the command Update drivers.
In the window that appears, click on the button Search for drivers on this computer, in the next click Review, select the folder containing the drivers and run the command Further. After this, the installation should begin.
Select manual driver search
Restoring a driver from a backup in DriverMax
To restore drivers from a previously created backup in the program DriverMax in the window Driver backup and restore run the command Restore drivers from backup. A window of the same name will appear, displaying a list of backup copies that the program can detect, as well as a Load button. Click on it and select the backup file.
Hello friends. I want to talk about it today how to install drivers and configure Windows 7. Yes, I already wrote a similar article, but it was about... But these are still two different operating systems, in which the settings are also different.
In Windows 7, the interface was completely changed, new methods for driver installation appeared, and quite a lot of new features were added in working with Windows. It is for this reason that I decided to once again describe the setup and optimization, but this time, Windows 7.
In fact, the developers have done a good job of making it easier for the user to work with Windows. Issues that in XP could only be resolved by completely manual settings, in the seven they are replaced by an automatic mode. For example, you installed a new device, but there is no driver, the system will offer an automatic solution to the problem, if you agree, the search and installation of the driver for this device will begin.
Also, if any program does not start due to incompatibility, the setup wizard again comes to the rescue, inserting all the settings so that everything works correctly. Of course, you can do this yourself and manually, but for inexperienced users, this is quite a big plus. And the standard set of settings, after installation, is much improved compared to XP, but still requires some changes.
How to install drivers for Windows 7
Installing drivers in Windows 7 is quite similar, but there are several nuances. In order to lead away what driver is missing we need to go to “Device Manager”, therefore, open “Start” and right-click on “Computer” and select the “Management” property.
A menu will appear in front of us, where we go to “Device Manager”, in which we are interested in what is displayed as “Other devices”. It is in this section that all devices for which our Windows could not find a driver during installation are shown.

Of course, the best way is to install the driver for Windows 7 from the disk that you should have received with your computer, just run the installation, wait for it to finish and restart the computer. But not everyone has this disk, or sometimes it’s not even included, but it doesn’t matter, now you’ll find out how you can update the whole thing without it.
The driver can be downloaded at any time from the official website of the manufacturer of your device; they are downloaded mainly in the form of Setup.exe - a file that is also simply launched and installed by clicking the “Next” button. But there are cases when the driver is a simple archive with files, which in the future will need to be unzipped and the driver inserted manually.
But now I want to talk about the advantages that have been added to the new OS. The fact is that in Windows 7 automatic user support has appeared, which will find and install the necessary driver for you. To do this, on an unknown device, click the bear and select “Update driver”.
Attention!!! For this installation method, an Internet connection must be present.

By clicking on driver update, a window will open where you can choose whether to manually install the driver or have the system find it for you. In the first option, if the operating system can find a suitable driver on the Internet, you just need to wait for the search and installation to complete. If nothing was found, go to the second option, click “Search for drivers on this computer.”

The manual installation window will open. The first thing we need to do is specify the path to our files; for this we can use the “Browse” button or open the folder with the driver and simply copy the path here in the address bar.
The next thing I would like to point out as a new plus in the seven is the ability to “Search including subfolders.” Now the system does not need to show the full path to the driver file, as was required in XP, but simply indicate the folder.
For example, if you have a Drivers folder and there is already another folder in it Audio_Driver which contains the necessary files, and you will indicate on the way Drivers only, then the system, not finding the driver in the root folder, will look for it in the subfolders of which it is Audio_Driver . In my opinion, this is a pretty good plus that greatly simplifies driver installation.
Specify the path and check the box for “Search subfolders” and click “Next”.

We are waiting for our driver to install; it is advisable to restart the computer after this so that the device works correctly. But if, after clicking “Next,” a notification appears that the required software could not be found, you may have downloaded the wrong driver. As you can see, installing drivers on Windows 7 has become easier compared to Windows XP, thanks to additional automatic settings.
Setting up Windows 7
Having installed all the necessary drivers, you can proceed to setting up our operating system. As I said earlier, the standard set of settings in Windows 7 is quite good, so optimization does not take much time at all.
1. “Start Menu”
In this menu, there are quite a large number of settings; you can remove unnecessary icons or add or change the location of the panel itself. But I recommend, first of all, to hide notifications from our support center, which will constantly bombard us with messages that the computer needs to be checked or that it is at risk. Call up the properties of the Start panel, and in the notification area, opposite the desired “Support Center” icon, set “Hide icon and notifications.”

Or you can simply go to the support center settings and turn off all messages.

2.“Connection Settings”
We go to the connection settings, where we need to uncheck the “QoS Packet Scheduler” because at home it is useless, but uses traffic resources. In the IPv4 protocol settings, it should be set to automatically obtain an IP address ( The exception is if your provider uses a static IP address, then you need to enter everything manually, all data must be provided by the provider).

3. "Update Center"
Be sure to install all updates in the Update Center. By the way, sometimes some drivers are installed when installing updates.

4. “User Accounts”
In this menu, I always disable User Account Control, because in some programs, when starting, you constantly need to press the “Run” button, which seems to me not very convenient. But, if you are not sure about the programs you will install, I recommend leaving a medium degree of control.

5. "System"
In the system settings, uncheck the automatic reboot box. Thus, in the event of a failure, we will be able to see the error code in order to know where to start looking for a solution to the problem

6. “Personalization”
Going to the “Personalization” item, disable the screen saver by setting “(No)” in the “Screen saver” field.

I recommend turning off the firewall to avoid subsequent application blocks. When setting up Windows 7, I always turn off the firewall, but I don’t touch the service itself, because when it’s turned off, some sharing options don’t work ( You cannot share devices, etc.) .

- Remote registry
- Tablet PC input service (disable, but if you have a candy bar with a sensor then leave it)
- Terminal Service (disable for home computers)
- Remote Desktop Service (on home PC, disable)
- Smart card
- Fax (disable if you do not use fax)
- Computer browser
Those services that are set to “Manual” can not be touched; they are already disabled and will only be launched at the user’s request or if a program that uses this service is launched.
As you can see, the list of Windows 7 settings after installation is minimal. The developers took into account all the shortcomings that were made in previous operating systems, and as a result, Windows 7 turned out to be a very convenient and simple operating system for novice PC users.
Installing drivers and setting up Windows 7