The computer froze with the error “Windows updates could not be configured” - what should I do? Error: We were unable to configure Windows updates How to remove Windows 7 update installation error
Each Windows product has its own life cycle. It begins when the system is first released and ends when its support and bug fixes cease. Windows 7 is no exception, and will continue to receive updates for a couple of years. In this article, we will look in detail at the main reasons why updates are not installed in Windows 7 and how to fix this problem.
Description of the problem
Microsoft ended support for Windows 7 in 2015. But despite this, the release of security updates and system error fixes will last until January 2020. Therefore, the problem when updates do not start, do not download, or an endless search for them appears is quite common and popular.
It is often associated with system problems or failures of various system components or services, but viruses should not be ruled out either. A full scan of your computer for threats and further cleaning may help, but is not a 100% guarantee.
Why Windows 7 updates won't install?
The main reasons for problems downloading and installing updates on the OS:
- Problems with downloading. Initially, files are downloaded into cache memory and stored there until the user allows their installation or restarts the computer. If they are downloaded with errors, installation of updates on the computer is impossible. Unfortunately, when you download update files again, the data is not updated.
- Windows registry problems. Often when installing updates, the problem is hidden in a failure of the registry settings or incorrect parameters set in the registry.
- The Windows Update service has failed.
- Lack or limited amount of free memory on the system disk. A fairly common problem, because if the required space on the hard drive is small, the update will not be installed or will be installed with errors.
- No internet or blocked by installed antivirus. Very often, the antivirus blocks files unknown to it. Disabling it while the update is downloading will solve this problem.
- Blocked by a virus.
What to do if Windows 7 won't update
If Windows 7 does not install updates or is endlessly searching for them, the first thing you need to do is use Microsot’s “Fix It” utility. Once launched, it will automatically fix all problems related to the update center. You can download the utility from the official website using the link.
Let's look at the main methods to fix the problem.
Clearing cached files
If the reason is downloading updates with errors, you need to clear the downloaded update files located in the cache memory. And only then download them again. To do this you should:

Registry settings
The problem with the OS registry can be resolved by removing the component responsible for updates. Follow these steps:

Starting OS services
If the installation of an update fails in Windows 7, the problem may be in a system service and can be resolved by performing the following steps:
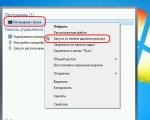
- Click “Start” → in the search, write “Services” → open this window.

- In the window that appears, look for a service with the name «
Windows Update." If the service is disabled, click “Run” and the problem will be solved.

- If the service is started and running, click “Stop”.

- Launch the “Command Prompt” by pressing “Win + R” → type the command “SoftwareDistribution” → “OK”.

- In the window that appears, delete all folders and files.

- Next we start the service « Windows Update » (point 2) and reboot the PC.
- Go to the update center and install updates without previous errors.
If you do not have a specific update installed (the example of the update “kb2999226” is considered), you need to enter the name of the update in the search field on the site, download it and install it on your computer.
Updating the system to the latest state is a very important factor in its correct operation and security. Let's look at the reasons why there may be problems with installing updates, as well as ways to solve them.
The reasons that updates are not downloaded to the PC can be either system failures or simply the user setting settings that prevent the system from updating. Let's consider all possible options for this problem and its solutions, starting with the simplest cases and ending with complex failures.
Reason 1: Disabling the feature in Windows Update
The simplest reason why new components do not download and install in Windows 7 is to disable this feature in "Windows Update". Naturally, if the user wants the OS to always be up to date, then this function must be enabled.


But for some reason, even when the function is disabled, the above icon may not be in the system tray. Then there is another possibility to solve the problem.
- Click "Start". Move to "Control Panel".
- Click "System and safety".
- In the window that appears, click "Turn automatic updates on or off".

You can also get there by entering the command in the window "Run". For many, this path seems faster and more convenient. Dial Win+R. will appear "Run". Enter:
Click "OK".
- Will open "Update centre". In the side menu, click "Settings".
- For any of the two options described above, a window will appear to select how to install new components. If in the field "Important Updates" parameter set "Don't check for updates", then this is the reason why the system is not updated. Then the components are not only not installed, but not even downloaded or searched for.
- You need to click on this area. A list of four modes will open. It is recommended to set the parameter "Install updates automatically". When selecting modes "Search for updates..." or "Download updates..." The user will have to install them manually.
- In the same window, make sure that all parameters are checked. Click "OK".


Reason 2: Service stop
The cause of the problem under study may also be the disabling of the corresponding service. This can be caused either by manually disabling it by one of the users, or by a system failure. You need to turn it on.
- Click "Start". Click "Control Panel".
- Click "System and safety".
- Sign in "Administration".
- A wide range of system utilities is presented here. Click "Services".

IN "Service Manager" You can get there another way. To do this call "Run" (Win+R) and enter:
Click "OK".
- A window appears "Services". Click on the field name "Name" to arrange the list of services in alphabetical order. Look for the name "Windows Update". Tag it. If in the field "State" not worth the value "Works", this means that the service is disabled. Moreover, if in the field "Startup type" set to any value except "Disabled", then the service can be started by simply clicking on the inscription "Run" on the left side of the window.

If in the field "Startup type" there is a parameter "Disabled", then it will not be possible to start the service using the above method, since the inscription "Run" it will simply be missing in its intended place.

If in the field "Startup type" option installed "Manually", then of course it is possible to activate using the method described above, but each time after starting the computer you will have to do it manually, which is not good.
- So, in cases where in the field "Startup type" set value "Disabled" or "Manually", double-click on the service name with the left mouse button.
- The properties window appears. Click on an area "Startup type".
- In the list that opens, select .
- Then click "Run" And "OK".

But in some situations the button "Run" may be inactive. This happens when in the field "Startup type" the previous value was "Disabled". In this case, set the parameter "Automatic (Delayed Start)" and press "OK".
- We return to "Service Manager". Highlight the service name and click "Run".
- The function will be enabled. Now opposite the service name in the fields "State" And "Startup type" the values should be displayed accordingly "Works" And "Automatically".


Reason 3: problems with the service
But there is a situation when the service seems to be running, but nevertheless does not work correctly. Of course, it will not be possible to check whether this is actually true, but if the standard methods of enabling the function did not help, then we perform the following manipulations.
- Go to "Service Manager". Highlight "Windows Update". Click "Stop service".
- Now you need to go to the directory "Software Distribution" to delete all data there. This can be done using a window "Run". Call it by pressing Win+R. Enter:
SoftwareDistribution
Click "OK".
- The folder opens "Software Distribution" in the window "Conductor". To select all its contents, type Ctrl+A. Once selected, press the key to delete it. Delete.
- A window appears in which you must confirm your intentions by clicking "Yes".
- After deleting, return to "Service Manager" and start the service according to the scenario that was already described above.
- After that, restart your computer and try updating the system manually so as not to wait for it to perform this procedure automatically. Go to "Windows Update" and press "Check for updates".
- The system will perform the search procedure.
- After its completion, if missing components are detected, a window will prompt you to install them. Click here "Install updates".
- After this, the components must be installed.


Reason 4: Lack of free disk space
The reason for the inability to update the system may simply be the fact that there is not enough free space on the disk on which Windows is located. Then the disk must be cleared of unnecessary information.
Of course, the easiest way is to simply delete certain files or move them to another drive. After removal, do not forget to clean "Basket". Otherwise, even if the files disappear, they may continue to take up disk space. But there are also situations when there seems to be nothing to delete or on the disk C only important content is present, and there is nowhere to move it to other disks, since they are also “packed” to capacity. In this case, use the following algorithm of actions.
- Click "Start". Go to the menu by name "Computer".
- A window opens with a list of storage media connected to this computer. We will be interested in the group "Hard disks". It provides a list of logical drives connected to the computer. We will need the disk on which Windows 7 is installed. As a rule, this is the disk C.
The amount of free space on it is indicated under the name of the disk. If it is less than 1 GB (and it is recommended to have 3 GB or more of free space), then this may be the reason for the inability to update the system. The red indicator also indicates that the disk is full.
- Right-click on the disk name ( RMB). Select from the list "Properties".
- The properties window appears. In the tab "Are common" press "Disk Cleanup".
- After this, an operation will be performed to estimate the amount of space that can be freed.
- After its completion, the tool will appear "Disk Cleanup". It will indicate how much space can be cleared by deleting this or that group of temporary files. By checking the boxes, you can specify which files should be deleted and which should be left. However, you can leave these settings as default. If you are satisfied with the amount of data being deleted, then click "OK", otherwise press "Clean up system files".
- In the first case, cleaning will occur immediately, and in the second, the information collection tool will again launch to estimate the amount of space that can be freed. This time it will scan system directories as well.
- The window will open again "Disk Cleanup". This time it will show a larger volume of deleted objects, since some system files will also be taken into account. Again, check the boxes at your discretion, depending on what exactly you want to delete, and then click "OK".
- A window will appear asking if the user is ready to permanently delete the selected files. If you are confident in your actions, then click "Delete files".
- Then the disk cleaning procedure starts.
- After it finishes, restart your PC. Back at the window "Computer", the user will be able to verify how much free space on the system disk has increased. If it was its overcrowding that was the reason for the inability to update the OS, it has now been eliminated.


Reason 5: Failed to load components
The reason that the system cannot be updated may be due to a boot failure. This may be caused by a system error or a simple internet outage. This situation leads to the fact that the component does not load completely, and this in turn leads to the impossibility of installing other components. In this case, you must clear the download cache so that the component can be downloaded again.

Reason 6: Registry errors
The inability to update the system may be caused by problems in the system registry. In particular, this is evidenced by the error 80070308 . To resolve this issue, follow these steps: Before starting manipulations with the registry, it is recommended to either create it.

Other reasons
There are a number of more general reasons why it is impossible to update the system. First of all, these could be glitches on the Microsoft website itself or problems with the provider. In the first case, you can only wait, and in the second, the maximum that can be done is to change your Internet service provider.
In addition, the problem we are studying may arise due to the penetration of viruses. Therefore, in any case, it is recommended to check your computer with an antivirus utility, for example.
It’s rare, but there are also cases when the standard antivirus blocks the ability to update Windows. If you cannot find the cause of the problem, then temporarily disable the antivirus and try downloading. If the download and installation of the components was successful, then in this case, either make additional settings of the anti-virus utility by adding the Microsoft website to the exceptions, or change the anti-virus altogether.
If the listed methods for solving the problem did not help, then you can try to roll back the system to a restore point created at a time when updates were made normally. This is, of course, if such a restore point exists on a specific computer. As a last resort, you can reinstall the system.
As you can see, there are quite a few reasons why the system cannot be updated. And each of them has an option, or even several options, to correct the situation that has arisen. The main thing here is not to mess things up and move from the simplest methods to more radical ones, and not vice versa. After all, the reason may be completely trivial.
Even though Microsoft no longer supports the Windows 7 operating system, it still provides security updates for it. The question of why updates are not installed is very relevant. This article will provide answers to fix common problems.
Automatic update disabled
A common reason that Windows 7 does not find updates is that auto-update is disabled in the settings. Enabling this feature is quite simple:
It happens that checkbox missing on the taskbar. Then you can solve the problem in another way:
- To do this, go to “Start”, select “ Control Panel»;
- Further " system and safety»;
- then select from the list " Turn automatic updates on or off».
Incorrect download of updates
You can fix the error of incorrect downloading of updates for Windows in the following way:

After this, you can restart the installation.
Registry problems
The reason that Windows 7 does not update may be a registry malfunction. You can fix it as follows:

The update service is not working correctly
Some problems with installing packages are related to the service responsible for downloading them. The failure can be resolved in several ways:

If the process fails to start again, you will need to perform additional steps:

Lack of hard disk space
The problems can be quite simple, for example, lack of hard drive space. For the installation services to function properly, you need minimum 5 GB free space.
The solution to the problem is quite simple. Requires removal unnecessary files and programs from the system disk. To do this, you can use standard Windows 7 tools, for example, “” located in the Control Panel. 
Internet problems
Problems with the Internet connection may be the reason why updates are not installed:

Damage to system component storage
It happens that problems can be caused by damage to system components. There may be reasons a bunch of:
- 0x800B0101 – the certificate could not be installed;
- 0x8007371B – transaction distribution error;
- 0x80070490 – error of a non-existent or deleted update file;
- 0x8007370B – error identifying object properties;
- 0x80070057 – parameters error;
- 0x800736CC – element matching error;
- 0x8007000D – data initialization error;
- 0x800F081F – missing required files.
Above are the most common errors that occur when system components are damaged. There are several methods for permission.
One of the most effective is installationWindows 7 in update mode. This option is characterized by the correction of most errors, while it will allow you to save personal files and system settings.
For this required:

When you run this command, the system will check the integrity of the files and will be able to restore them. If the data is recovered, you can run the installation again.
Error 643
This crash is dependent on a Microsoft NET Framework service. To solve a software problem, you will need to do the following:
The second option involves removing this component and reinstalling it.
Other solutions
In addition to the above methods for correcting failures when installing updates using system tools, you can use additional software.
Using Microsoft FixIt
To troubleshoot problems, you will need the Fixit utility, created by the operating system manufacturer. It eliminates problems associated with the operation of the Update Center.
After downloading the software, installation is required. During this, the program will automatically create restore point. The utility will search for data about failures and try to fix the files.
Clearing cache
In some situations, Windows 7 does not search for updates due to loading problems. The essence of the process is that the files are loaded into the cache memory and stored there until the user starts installing them:

Running an update manually
To manually start, you will need to call the “Win + R” utility and enter the request “ Wuapp" In the window that opens, select "". In the “Important” section, select the first installation option. Thus, the user will install updates manually. 
Updated: 05/02/2017 Published: 2016 or earlier
Description
Windows does not load or takes a very long time to load and says “Windows updates could not be configured Cancel changes. Don't turn off your computer."

Cause
During the installation of updates, a critical error occurred that the system must correct. Since Windows doesn't know exactly which update caused the problem, it uninstalls any patches that were last installed. If there are a lot of them, the system will take a long time to load, which will create the feeling of a stuck boot.
The main reasons for incorrect installation of updates are an unexpected power outage or an internal error in the code of the patch itself.
Solution
Step 1 - go to Windows:
We are waiting for the system to load. This will happen sooner or later (sometimes you will have to wait up to 12 hours).
If you can't wait:
- We boot the system in safe mode - this does not always help, since Windows can also start rolling back updates in it.
- We start Windows recovery from the installation disk - you will have to work on the command line.
Step 2.1 - if you managed to wait for the system to boot or start it in safe mode:
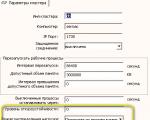
Right-click on Computer - Properties - Windows Update - Settings.
In the window that opens, in the section Important updates choose Look for updates, but the decision to download and install is made by me:
and press OK.
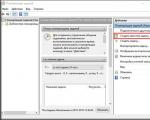
Now open Windows services and disable Windows Update:

Go to the folder C:\Windows\SoftwareDistribution\Download and delete everything that is in it.
* most often, the system drive is C, but this is not always the case. Please take this note into account and replace the letter if necessary.
Step 2.2 - if you started Windows recovery from disk:
Select Command Prompt as your recovery tool.
Run the following commands:
> ren C:\Windows\SoftwareDistribution\Download C:\Windows\SoftwareDistribution\Download.old
* this command will rename the Download folder to Download.old, thereby making downloaded updates for the system unavailable.
> sc config wuauserv start= disabled
* disable Windows automatic update service.
Step 3 - start Windows in normal mode:
After making the settings in step 2, restart the computer. It may happen that the system will start rolling back updates again. In this case, you will have to wait until the procedure is completed and restart the computer again.
Now we turn on the update service and manually install Windows patches. But let's not install all the packages at once, since this is what leads to problems. We select several updates, wait for them to install and restart the computer. Continue this way until all the fixes have been installed.
In my practice, the following error very often occurs - during the update process, Windows 7 cannot install some of them, so the following message appears: “Windows updates could not be configured. Changes are being canceled. Do not turn off the computer.” Moreover, the rollback process itself can last indefinitely: an hour or two , five or even a day. I have to wait for a really long time, how to solve this problem?
To resolve this error you need to delete or rename the folder c:/windows/SoftwareDistribution/Download/
Earlier, I wrote how to deal with the problem when installing updates in Windows Vista. We will act by analogy.
To fix update problems, we need to go to the Windows 7 “computer troubleshooter” component. For this
- Press and hold the power button for about 10 seconds. the computer will turn off
- turn it on again and press the F8 button often and often
- In the menu that appears, select “troubleshooting”
- select the keyboard layout
- select a username and enter a password (if necessary)
- launch the command line component
- enter the following command:
- close the command line
- reboot the computer
itech-master.ru
We were unable to configure or complete windows updates: what to do, how to fix the error
The Windows 10 operating system requires constant updates to function properly. With each new patch, Microsoft improves the system in terms of security and also adds new features to it. But Windows updates do not always go smoothly, and sometimes users have to deal with errors. After downloading an operating system update, the computer must traditionally be rebooted for it to install and take effect. However, during the installation of updates after a reboot, the user may encounter one of the following errors:
Both of these errors make it clear that something went wrong during the system update process. In this article, we will look at what to do if these errors occur and how to fix them.
What to do if you can't complete a windows update
When a windows update fails to complete, the user sees a message on the screen that the changes made to the system will be rolled back. You just need to wait until the computer returns the system to the state it was in before installing the latest update.
However, it often happens that the message “We were unable to configure windows updates” hangs for a long time or appears even after the computer automatically restarts. In such a situation, turn off the computer only as a last resort. It is recommended to wait until all changes are canceled. This may require more than one, not two, or even three system reboots. Sometimes undoing changes can take several hours.
Please note: The duration of undoing changes depends on many parameters, but, first of all, on the speed of the hard drive and the amount of information on it. For example, on laptops with slow hard drives, undoing a Windows update can take 5 hours or more.
How to complete a windows update if an error occurs
It is not recommended to leave your computer without updating - this may cause errors in the future when trying to run applications, reduces the level of security and can lead to various problems. There are several options for what to do if you can’t set up a Windows update, and we’ll talk about them below.
Removing the Windows 10 update cache
The first thing you need to try if you can’t set up a Windows update is to clear the SoftwareDistribution folder, in which the operating system update cache accumulates, or delete the contents from it. Depending on the “behavior” of the computer, this will have to be done in different ways.


After performing the steps described above in the first or second way, make sure in the system settings that Windows downloads and installs the update without errors. Next, restart your computer for the update to be applied. Please note: If no more errors occur, you can delete the SoftwareDistribution.old folder, which contains an unnecessary update cache.
Checking your computer with diagnostic tools
If the method described above did not help fix the problem that is preventing you from completing the Windows update, you can try using the built-in diagnostic utilities of the operating system. As in the solution to the problem above, the actions will depend on the presence or absence of the ability to load Windows.
If the computer finishes undoing the changes and allows the system to boot

If your computer does not complete undoing changes and keeps restarting
- Open the command line using a bootable USB flash drive (the detailed process of how to do this is described above in the instructions for deleting the update cache);
- Write and apply the following command to reboot your computer in safe mode: bcdedit /set (default) safeboot minimal
- Once your computer is restarted in Safe Mode, run the commands to launch diagnostic tools through the command line. To do this, write one by one on the command line: msdt /id BitsDiagnostic msdt /id windowsUpdateDiagnostic
- Next, enter the command to disable safe mode: bcdedit /deletevalue (default) safeboot
- After a reboot, the “We were unable to complete updates” error should no longer bother you.
Checking user profiles
Another reason for the error “The update could not be completed” in Windows 10 is a problem in the registry with user profiles. It can be eliminated in two ways. The simplest one is to perform a registry restore. A more complex option involves making changes to the registry yourself as follows:

Important: Before you begin deleting or changing registry settings, we recommend that you create a restore point.
Other ways to fix the “We were unable to configure updates” error
If none of the methods above helped fix the error that occurs when trying to install Windows updates, you can try the following:
If none of the tips listed in the article helped solve the problem, you can try resetting Windows or, as a last resort, reinstalling it.
OkeyGeek.ru
“Failed to configure Windows updates. Cancel changes" Problem loading Windows 8
Our regular reader Serg encountered the same problem when loading Windows 8. Good afternoon! Could you help me with my problem. While installing the latest updates on Windows 8, the electricity in the house unexpectedly went out. The laptop survived on an old battery for several minutes and, naturally, crashed. After the light was turned on and the system began to boot, a screen appeared with the message “Failed to configure windows updates. Cancel changes. Don't turn off your computer." I waited for several hours - no effect. A power reboot doesn't help either; every time Windows 8 loads, it stops at this message. The most interesting thing is that the system does not hang, caps lock and num lock wink cheerfully when pressed, the hard drive sometimes crunches, but it never reaches the desktop.

Have you encountered such a problem? Any ideas on what I should do? I really don't want to reinstall Windows.
Thank you in advance!"
So, in this article we will try to summarize the experience gained as a result of solving the problem on Serg’s laptop and the experience of other lucky people who encountered a similar problem.
Judging by the text of the message, for some reason Windows 8 was unable to install updates correctly (in Serg’s case, due to a power outage). As a result, the next time you boot, the “smart” system decides that its crash is caused by a problem in one of the installed updates and tries to roll them back, but for some reason it cannot do this. As a result, the computer booting with Windows 8 / Windows Server 2012 stops at the screen with the inscription:
Failed to configure windows updates. Cancel changes. Don't turn off your computer
In English the error looks like this:
Failure configuring windows updates. Reverting changes. Don't turn off your computer

In some cases, it’s really worth waiting a few minutes/hours, after which the system itself will correctly roll back the latest updates. But it often happens that this message appears at every boot and somehow it becomes impossible to remove it and log into the system normally.
In general, Microsoft described this problem in one of its knowledge base articles - http://support.microsoft.com/kb/949358. The article suggests performing the following operations as possible methods of “treatment” (sequentially, starting with the first, moving on to the next solution if the previous one did not help):
- Restart your computer
- Disconnect all removable media and external hard drives from the computer, and reboot again
- Check the system with the Windows Update Troubleshooter utility
- Use the system recovery functionality (boot from an installation/boot disk and roll back to one of the previous restore points)
- Reset Windows 8 using the Refresh or Reset functions
- Reinstall the OS
Methods 1 and 2, I think, do not need additional comments. They are worth trying first.
Windows Update Troubleshooter
Regarding method 3 – you can run the Windows 8 update diagnostic utility only from a running system, but since it won’t boot, let’s try to perform such a check in safe mode.
To do this, you need to boot from the boot or installation disk/flash drive for windows 8. Then we need to launch the command line. If you are using an installation disk with Windows 8, the easiest way to do this is by pressing the Shift+F10 key combination on the system language/layout selection screen.
On the command line we will execute
Bcdedit /set (current) safeboot minimal

After the next reboot, the computer should boot into safe mode.
Launch the Update Service Diagnostic Wizard by running the command:
Msdt /id windowsUpdateDiagnostic

Then simply follow the wizard's instructions.
After finishing the wizard, disable booting Windows 8 in safe mode:
Bcdedit /deletevalue (default) safeboot
We reboot the system and try to boot in normal mode. If it doesn't help, move on to the next method.
System Restore
If applicable, try performing a system restore by booting from the boot/installation disk and see if the problem goes away.
If this doesn’t help, and you really don’t want to reinstall/reset Windows, try these hacks first.
Clearing the update cache
Again, boot into safe mode (described above), open the command line and clear the contents of the C:\windows\SoftwareDistribution\Download\ folder (it is in this folder that windows downloads updates and starts installing them from here)). You can do this directly from Explorer or with the following command:
Ren C:\windows\SoftwareDistribution\Download Download.old
Disable automatic start of the Windows Update service:
Sc config wuauserv start= disabled
We check whether Windows 8 boots in normal mode, if so, enable autostart of the update service and start it:
Sc config wuauserv start= auto net start wuauserv
The system must download updates again and install them.
Restoring the Windows 8 Component Store
Let's try to restore the Windows 8 component store using DISM. To do this, boot into safe mode again and execute the commands sequentially on the command line:
DISM.exe /Online /Cleanup-image /Scanhealth DISM.exe /Online /Cleanup-image /Restorehealth

Disable booting in Safe Mode and check if Windows 8 boots in normal mode.
If this does not help, and the message “Setting up windows updates. Reverting changes" does not disappear, you should probably think about resetting or reinstalling the system...